You’re staring at a poster in the gym or a grainy JPEG on your phone. It’s a mess of red fibers and Latin labels. Most people look at an upper body diagram muscle chart and see a confusing jigsaw puzzle of "ceps" and "muscles with weird names." They want to know why their shoulder hurts when they bench press or how to actually grow their back, but the diagram just stares back with a cold, scientific glare. Honestly, the human body isn't a static map; it's a living, breathing pulley system. If you don't understand how these muscles pull against each other, you're basically just guessing when you pick up a dumbbell.
Understanding your anatomy isn't just for medical students or people who wear lab coats. It's for anyone who wants to move better.
The Big Movers: Reading the Anterior Upper Body Diagram Muscle Groups
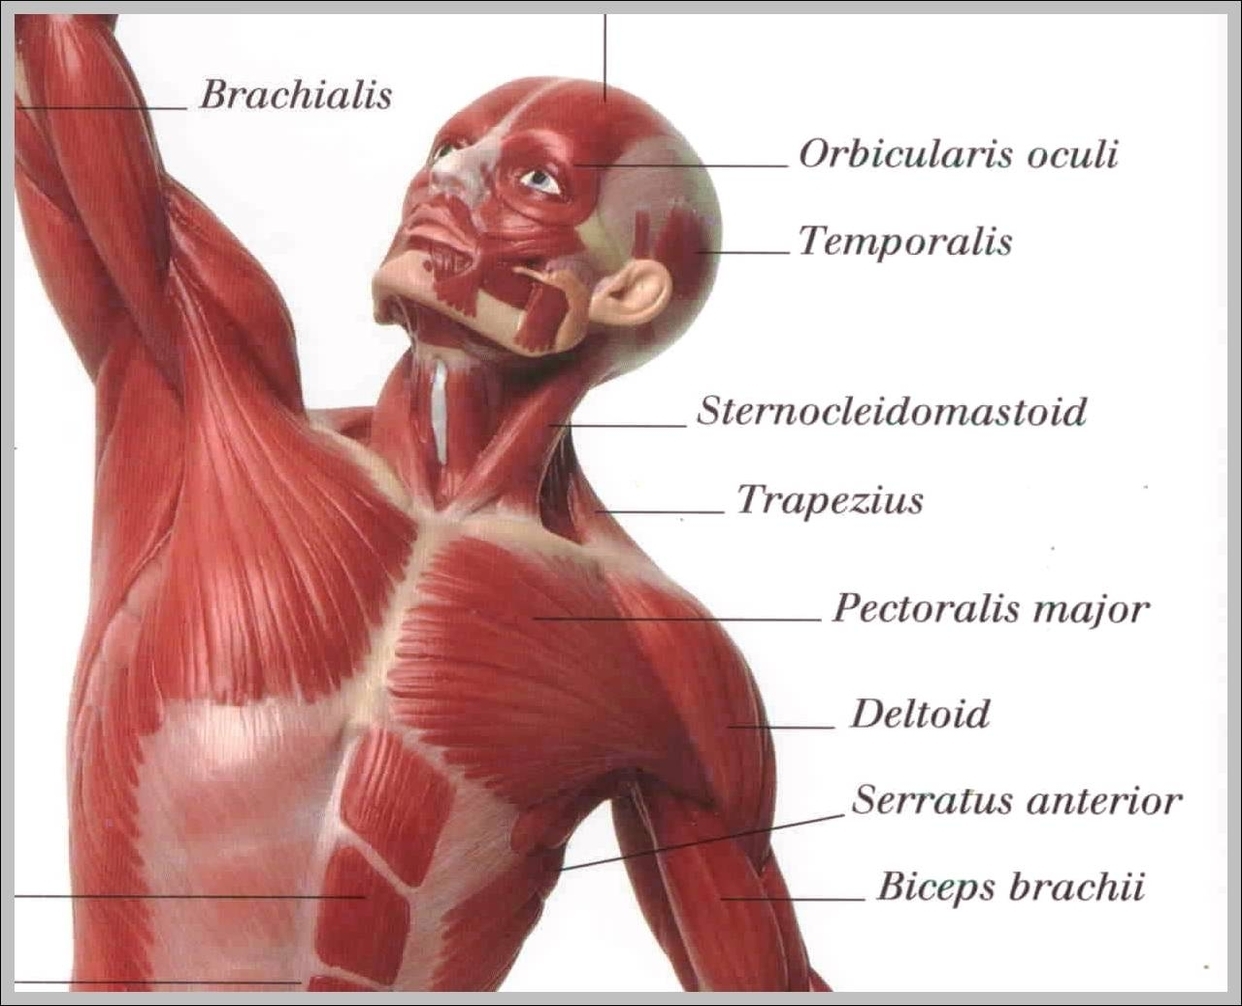
When you flip over a standard anatomical chart, the front—the anterior view—is usually dominated by the chest and shoulders. The Pectoralis Major is the king here. It’s that large, fan-shaped muscle that covers most of your upper chest. Most people think it just pushes things away. That’s true, but it also handles internal rotation of the arm. If you’re looking at a high-quality upper body diagram muscle layout, you’ll notice the "pecs" actually have two distinct heads: the clavicular (upper) and the sternocostal (lower). This is why your trainer tells you to do incline presses; you're literally targeting a different "zip code" on the same muscle map.
Just above the pecs, you've got the Deltoids. These are the "caps" of your shoulders. A common mistake when looking at a diagram is assuming the shoulder is one big muscle. It’s not. It’s a three-headed beast: anterior (front), lateral (side), and posterior (back). The lateral delt is what gives you that "wide" look, but on a 2D diagram, it’s often hard to see how it wraps around the joint.
Then there’s the Serratus Anterior. You’ve probably seen these on boxers—they look like finger-like projections along the ribs. They are often called the "boxer's muscle" because they’re responsible for protracting the scapula (pushing your shoulder blade forward). If these don't show up on your diagram, get a better diagram. They are essential for shoulder health. Without a strong serratus, your shoulder blade doesn't move right, and that leads to the dreaded "impingement" everyone complains about.
The Arms are More Than Just Biceps
Let’s talk about the arms. Everyone zooms in on the Biceps Brachii. It’s the "show" muscle. But if you look closely at a professional-grade upper body diagram muscle illustration, you’ll see the Brachialis tucked underneath the bicep. This little guy is actually the strongest flexor of your elbow. If you want bigger arms, you don't just work the bicep; you work the brachialis to "push" the bicep up from underneath. It’s like putting a lift kit on a truck.
Turning it Around: The Complex World of the Posterior Map
The back is where things get complicated. Most people see one big slab of meat, but a real-world upper body diagram muscle breakdown shows a multi-layered architecture.
The Trapezius is the most misunderstood muscle in the upper body. Most people think "traps" are just the bumps next to your neck. In reality, the Trapezius is a massive, diamond-shaped muscle that runs from the base of your skull all the way down to the middle of your back. It’s divided into upper, middle, and lower fibers. The lower traps are notoriously weak in people who sit at desks all day. When they fail, your shoulders round forward, and you look like a question mark.
Underneath the traps, you have the "hidden" muscles.
- Rhomboids: These sit between your shoulder blades. They retract the scapula. Think of them as the muscles that let you "squeeze" your shoulders together.
- Latissimus Dorsi: These are the "wings." They are the largest muscles in the upper body. They start at the lower back and actually wrap around to attach to the front of your humerus (arm bone). It’s a weird bit of engineering, but it’s why pull-ups make your back wide.
- Erector Spinae: These are the vertical cables running alongside your spine. They keep you upright.
The Rotator Cuff: The Muscles You Can't See
Here is a fun fact: most upper body diagram muscle charts for beginners don't even show the most important shoulder muscles. I'm talking about the SITS muscles—the Rotator Cuff. These are deep muscles. You’ve got the Supraspinatus, Infraspinatus, Teres Minor, and Subscapularis.
They don't make you look good in a t-shirt, but they keep your arm from falling out of its socket. The Supraspinatus is the one most people tear. It lives in a tiny little tunnel of bone, and if your posture is bad, that tunnel gets smaller until it starts fraying the muscle like a rope against a sharp rock. This is why understanding the "internal" parts of a diagram is just as vital as the "external" parts.
Why Your Posture Messes Up the Map
Diagrams always show the human body in "anatomical position"—standing straight, palms facing forward. Nobody actually lives like that. We spend our lives hunched over iPhones or steering wheels.
When you slouch, the muscles on your upper body diagram muscle chart start to change length. Your pecs get "short and tight." Your rhomboids and lower traps get "long and weak." This is called Upper Crossed Syndrome. It’s basically a mechanical failure of the diagram. Your muscles are pulling in directions they weren't meant to pull.
If you're using a diagram to figure out why your neck hurts, look at the Levator Scapulae. It’s a thin muscle that runs from the top of your shoulder blade to your neck. When your shoulders slump, this muscle works overtime to hold your head up. It gets angry. It knots up. No amount of rubbing your neck will fix it if you don't address the fact that your pecs are pulling your shoulders forward in the first place.
The Nuance of Muscle Fiber Direction
One thing a static upper body diagram muscle often fails to convey is the "pennation" or the direction of the fibers. This matters a lot for how you train. For instance, the fibers of your chest don't all run horizontally. The upper fibers run diagonally upward toward your collarbone.
If you move your arm in a way that doesn't align with those fibers, you aren't actually "loading" the muscle efficiently. This is why bodybuilders talk about the "mind-muscle connection." It's not some mystical thing; it's literally just picturing the diagram in your head and moving your limb in the same direction the fibers are pointed.
Real-World Application: Moving Beyond the Image
So, how do you actually use this information? Stop looking at the upper body diagram muscle as a map of things to "make big" and start looking at it as a map of "functions."
- Identify the Weak Links: Most people have overdeveloped anterior (front) muscles and underdeveloped posterior (back) muscles. If your diagram shows a massive chest but your back looks like a flat sheet of paper, you’re headed for a shoulder injury.
- Trace the Origin and Insertion: Every muscle starts somewhere (origin) and ends somewhere (insertion). If you know that the Biceps Brachii inserts on the radius (forearm bone), you'll realize that "twisting" your pinky toward the ceiling during a curl actually activates the bicep more because it's involved in supination, not just flexing the elbow.
- Think in Layers: Remember that what you see on the surface isn't the whole story. The "six-pack" (rectus abdominis) is the top layer, but the Transverse Abdominis is the "corset" underneath that actually keeps your spine stable. In the upper body, the Serratus and Rotator Cuff are the "unseen" heroes that allow the "show" muscles to work.
Actionable Next Steps for Better Anatomy Mastery
If you really want to master the upper body diagram muscle landscape, don't just look—feel.
Start by palpating your own muscles while you move. Place your hand on your opposite shoulder and move your arm around. Feel the deltoid contract. Reach behind your back and feel the shoulder blade move when you shrug. This turns a 2D image into 3D kinesthetic awareness.
Next, look up "functional anatomy" videos that show how these muscles interact during complex movements like a push-up or a row. You’ll see that the "chest" doesn't work alone; it works with the triceps and the front delts.
Finally, use this knowledge to audit your workout. If your routine is 80% "pushing" (chest, shoulders) and only 20% "pulling" (back, rear delts), you are ignoring half of your anatomy map. Aim for a 1:1 or even a 2:1 ratio of pulling to pushing to keep your "diagram" in balance. This protects your joints and, honestly, makes you look much better in the long run.
Focus on the small muscles—the ones usually labeled in tiny print on the diagram—and the big ones will take care of themselves.